The “Video memory management internal” error is a Blue Screen of Death (BSOD) issue that can lead to system instability and poor video performance. You can fix the error by addressing its causes, including a faulty hard drive or drivers, as well as malfunctioning RAM. This post explores how to fix the “Video memory management internal” error on Windows.
Good to know: experiencing issues after a recent Windows update? Learn what to do about it.
Preliminary Troubleshooting
The following are quick solutions, that when applied, may remove the BSOD from your system without the need to take any additional steps.
- Check the GPU drivers – given that faulty drivers often constitute a primary cause of video memory errors, your initial course of action should involve updating your display adapter drivers via Device Manager. The error seems strongly correlated with malfunctioning NVIDIA drivers. If your PC is running one, uninstall the driver using the widely-used DDU utility, then manually download and install the latest driver from the official NVIDIA website. If the error appeared after a recent driver update, you may want to roll back the display adapter driver and check whether the issue goes away.
- Update your PC – make sure you’ve installed the latest updates on your PC before proceeding any further. These updates often include fixes for known issues, such as the “Video memory management internal” error.
- Perform an SFC scan – running an SFC (System File Checker) scan can fix corrupted system files that may trigger the error. Once these files are repaired, the issue may disappear.
If you’re still facing the BSOD, even after implementing these solutions, continue on with the following more-targeted fixes.
1. Use Compatibility Mode to Open Applications
Compatibility Mode enables older software or applications to run smoothly on newer Windows versions. If you’re facing the “Video memory management internal” error while running a specific program, running it in Compatibility Mode will help reduce any possible conflicts with your video memory.
Right-click the program in question, and select Properties from the context menu. Switch to the Compatibility tab, tick the box next to Run this program in compatibility mode for, and select an OS version.
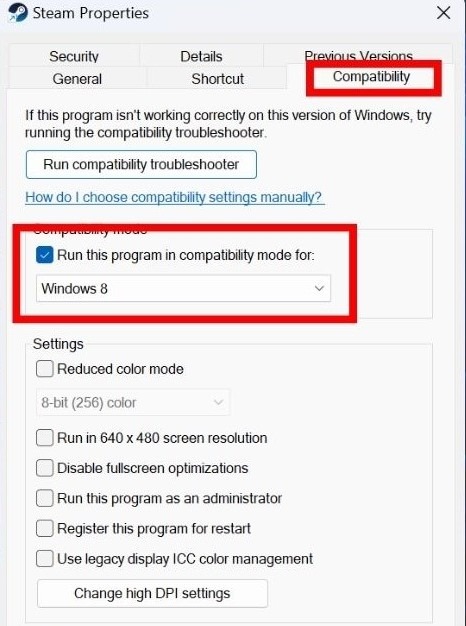
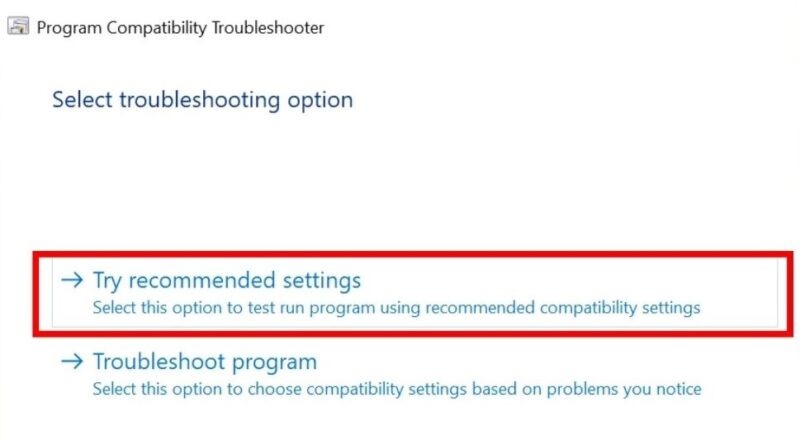
If you’re not sure which version of Windows is compatible with the program, select Run compatibility troubleshooter instead.
Select Try recommended settings.
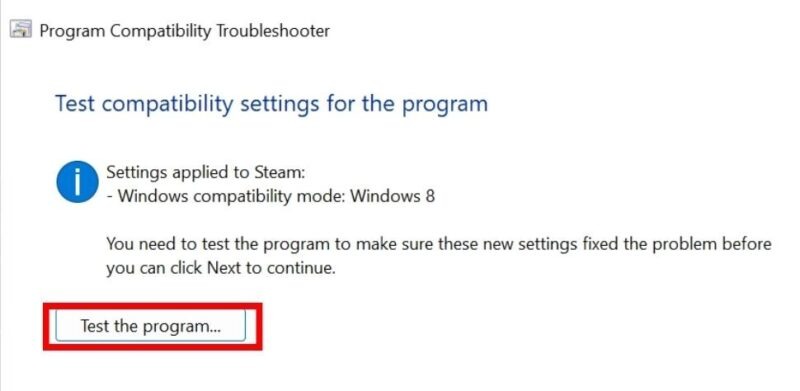
Click Test the program and wait a few seconds for the program to open in Compatibility Mode.
Tip: it can be useful to know how to install RAM on your PC, should the need arise.
2. Check Your RAM
Defective RAM can be one of the reasons behind the “Video memory management internal” error on Windows. An easy solution can be to inspect your computer’s RAM using the Windows Memory Diagnostic tool.
Open the Run tool by pressing Win + R. Type mdsched.exe and hit Enter. Select the Restart now and check for problems (recommended) option in the next window.
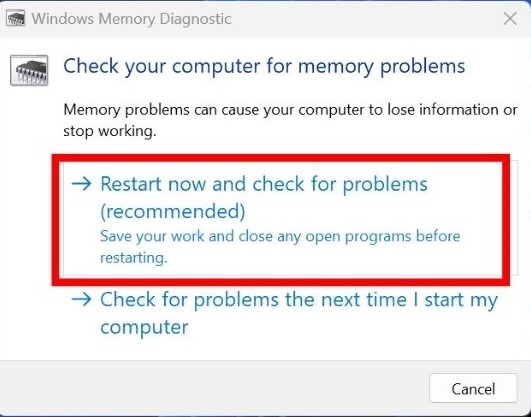
After the tool scans your PC’s RAM, your device will restart.
After rebooting, you’ll see the test results on your screen. If the tool has detected any issues, follow the on-screen commands to fix them.
If the error still appears, try running the Windows Memory Diagnostic tool in an advanced mode. The tool runs in Standard mode by default, but you can run the Basic or Extended mode to inspect your computer’s RAM further.
3. Check Hard Drive
Hard drives can develop problems over time, such as bad sectors, data corruption or mechanical failures. Identifying these issues early can help you take action to prevent data lost or system crashes. To get started, check out our post on how to check your hard disk health on Windows.
While all these methods are great for checking hard disk health, they won’t fix the problem for you. If the results of these checks are less than positive, you should take action immediately. First and foremost, use Windows’s built-in File History feature to make a backup of all important files. Also, ensure that you’re saving your work more frequently, and have another drive or device ready in case of total hard drive failure.
Tip: in the market for a new GPU? Check out our graphics card buyer’s guide for tips on how to choose the right option.
4. Stop Overclocking
Overclocking is a process that enhances the performance of the hardware, allowing it to process data and perform tasks at a faster rate than originally designed.
While overclocking can allow your computer to perform better, it can also lead to problems, such as instability and overheating that can eventually cause errors, like “Video memory management internal.” As a result, it can be a good idea to disable overclocking and minimize the chances of the error.
This can be done by reverting the BIOS settings to their default configuration.
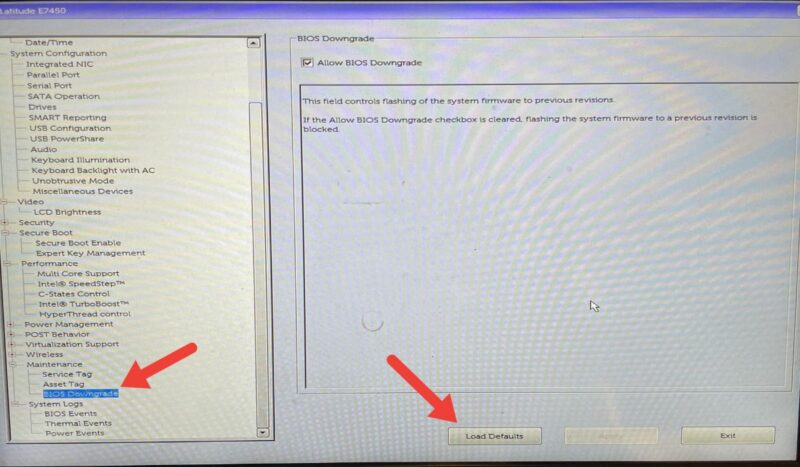
Turn on your computer, and press your computer’s BIOS key, such as F2 or Delete, until the BIOS screen pops up. The exact BIOS key depends on your motherboard manufacturer.
Inside the computer’s settings, click Maintenance -> BIOS Downgrade, select Load Defaults, then click Exit.
5. Reset Windows
If none of the methods above worked for you, you may need to reset Windows. Doing so will effectively restore your Windows installation to a clean state, similar to the way it was when you first installed it or when you purchased the computer. This should eliminate any video memory errors from your system.
Fortunately, you can reset Windows without losing your data, but to be on the safe side of things, it’s recommended that you make a backup of all important files and documents beforehand.
FYI: learn how to find your Windows product key and activate your OS version.
Get Rid of Annoying Blue Screen Errors
Unfortunately, Blue Screen of Death errors are quite common on Windows. If you’re dealing with a “System service exception” BSOD, check out our guide to learn what to do next. Alternatively, if your system is plagued by the “DPC Watchdog violation” issue, we have a list of fixes for this as well.
Image credit: Unsplash. All screenshots by Khizer Kaleem.
Our latest tutorials delivered straight to your inbox