
Whenever a major release of macOS becomes available, the air gets filled with a mix of anticipation and excitement. But as every seasoned Mac user knows, system updates aren’t always as straightforward as clicking “Install.” Sometimes the digital path to new features is marred by unexpected hurdles, and S.M.A.R.T. errors are among them. In this guide, we uncover the meaning behind S.M.A.R.T. issues during macOS installation and show how to fix them.
S.M.A.R.T. Errors During macOS Installation
You’re face-to-face with a message that’s throwing a spanner in your macOS installation works. It reads as follows:
This disk has S.M.A.R.T. errors.
This disk has a hardware problem that can't be repaired. Back up as much of the data as possible and replace the disk.
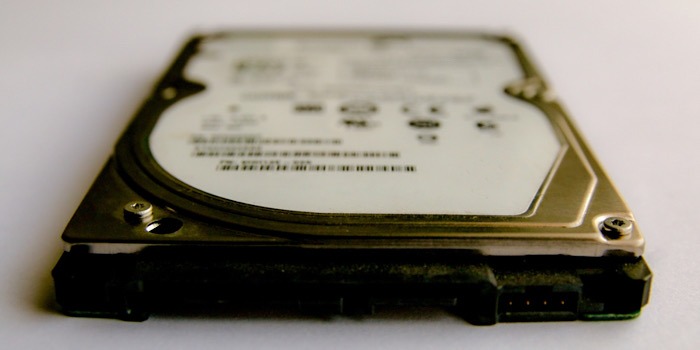
What does this mean? S.M.A.R.T. (Self-Monitoring, Analysis, and Reporting Technology) is an early warning system built in to your hard drive. It’s like your drive’s crystal ball, predicting potential hardware problems before they strike, based on factors such as:
- Bad sectors: tiny areas on your hard drive’s surface that can’t be read or written to anymore, like potholes on your drive’s information highway.
- Read/write errors: the hard drive is having trouble either reading data from or writing data to the disk. It’s like a stutter in your drive’s conversation with your Mac.
- High operating temperatures: overheating can mess with your drive’s performance. Imagine trying to work in a sauna. Not fun, right?
- Reallocated sector count: this is when your drive finds a bad sector and switches it out for a spare one. It’s like finding a rotten apple in a barrel and replacing it with a fresh one. But if it’s happening too often, you can run out of fresh apples.
The good news is that every technical problem has a solution – it’s just that not all solutions are equally easy or inexpensive to implement. Let’s start with the S.M.A.R.T errors during macOS installation that require the least time and money to solve.
Tip: you can prevent running into S.M.A.R.T. errors by learning how to repair hard disks with fsck on macOS.
1. Redownload the macOS Installer
Sometimes the troublemaker isn’t your hard drive, and is the macOS installer itself instead. One simple way to rule out this culprit is to re-download the macOS installer. By redownloading the installer, you’re ensuring that you have the most recent and complete version of the software, free of any potential glitches or corruption that could have occurred during the initial download.
- Open Finder and navigate to the “Applications” folder.
- Delete the current macOS installer by right-clicking it and choosing the “Move to Trash” option. Don’t see an installer? You are ready to move on to the next step.
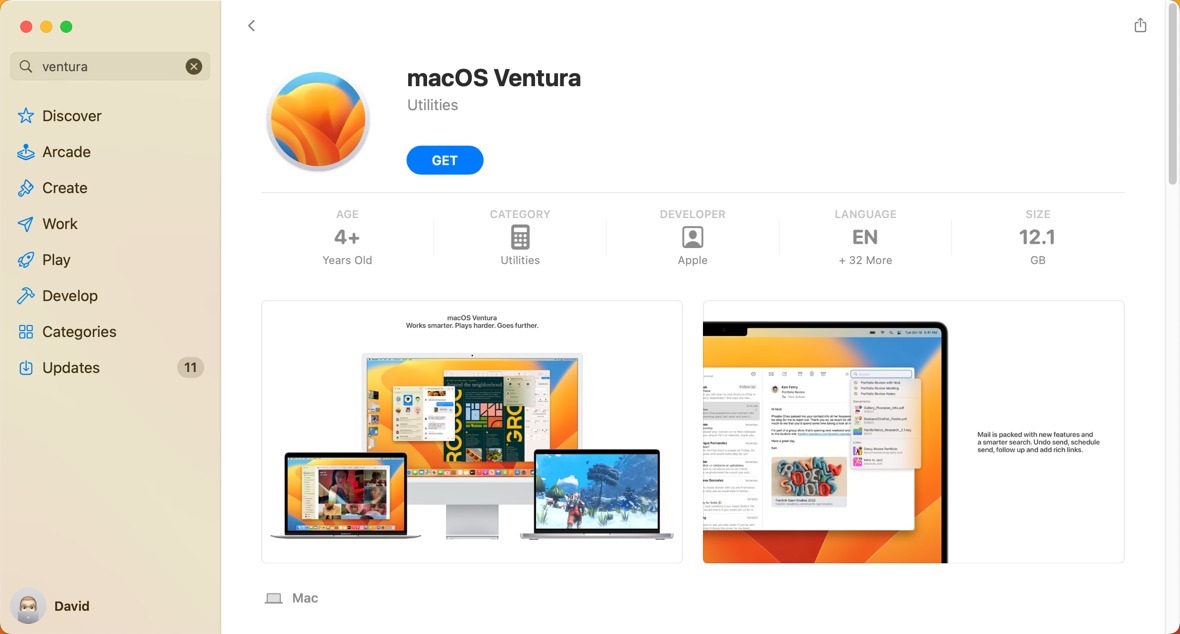
- Open the “App Store” app and download the macOS installer again. Run the installer and attempt to update to macOS Ventura. If the error persists, shift your focus to your hard drive by following the steps below.
2. Repair Your Hard Drive Using Disk Utility
Your Mac’s built-in Disk Utility is like a first aid kit for your hard drive. In fact, it comes with a disk repair tool called First Aid, which you can use to check any drive for errors and repair them if necessary.
- Launch the “Disk Utility” app from “Applications -> Utilities.”
- Select your main system drive, typically labeled “Macintosh HD” in the left pane.
- Click the “First Aid” button.
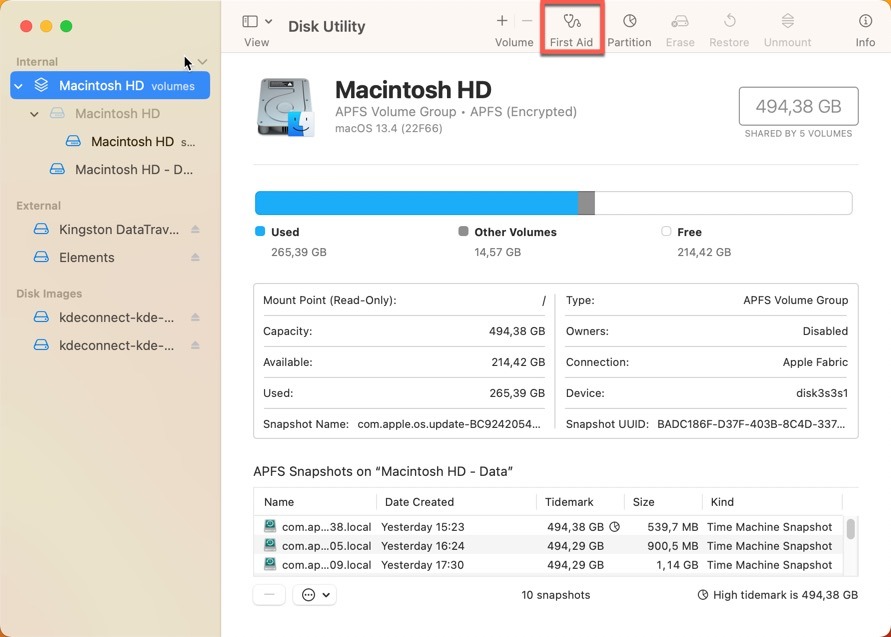
- Confirm your decision to scan the selected drive by clicking the “Run” button. Let Disk Utility do its thing.
Tip: Disk Utility can do much more than scan your hard drive for errors, so mastering this built-in system tool is something every macOS power user should do.
3. Install macOS from a USB Drive
Sometimes, S.M.A.R.T. errors may not be due to a faulty hard drive, but rather glitches in your macOS system that get stirred up during the installation process. In such cases, installing macOS from a USB drive can be an effective workaround. This method sidesteps potential system bugs by bypassing the current version of macOS during the installation process. Below is a quick overview of what it takes to install macOS from a USB drive:
- Prepare your USB drive by formatting it as “Mac OS Extended (Journaled)” using Disk Utility. Make sure to choose the “GUID Partition Map” scheme.
- Download the macOS installer from the “App Store” app.
- Copy the installer to your USB drive using Terminal. You will need about 24GB of available disk space on your USB drive to copy over the macOS Ventura installer. It’s recommended that you have double that space available, and the installer is about 12GB.
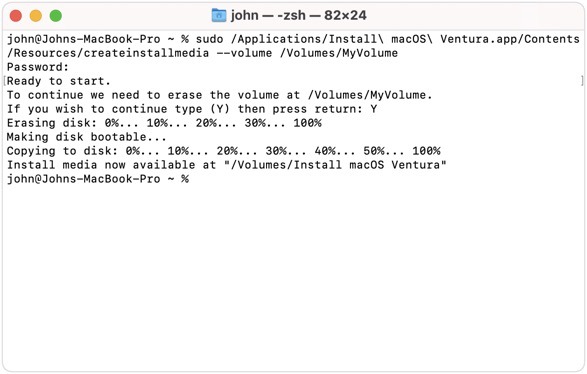
- Restart your computer, and boot from your USB drive. Follow the onscreen installation instructions to install macOS on your system drive.
Good to know: it’s important to note that the process can take some time and requires a careful follow-through of steps. Apple covers it in detail, providing step-by-step instructions for both Apple silicon and Intel Macs.
4. Format Your Hard Drive
Another solution you may want to consider when faced with S.M.A.R.T. errors during macOS installation is formatting. As drastic as this solution may sound, it can solve some logical issues with your hard drive. Of course, it won’t rewind the clock and reset the lifespan of a failing hard drive, so we recommend you think twice before you try this, as it will cost you all of your content and settings, as well as any apps that you have installed.
Fortunately, Apple made it straightforward for users to format the system drive by introducing the “Erase Assistant” tool. With it, the entire process takes just a few steps:
- Open the Apple menu in the top-left corner of your screen, select “System Settings,” then click on “General” in the sidebar.
- Navigate to the “Transfer or Reset” section. Click on “Erase All Content and Settings.”
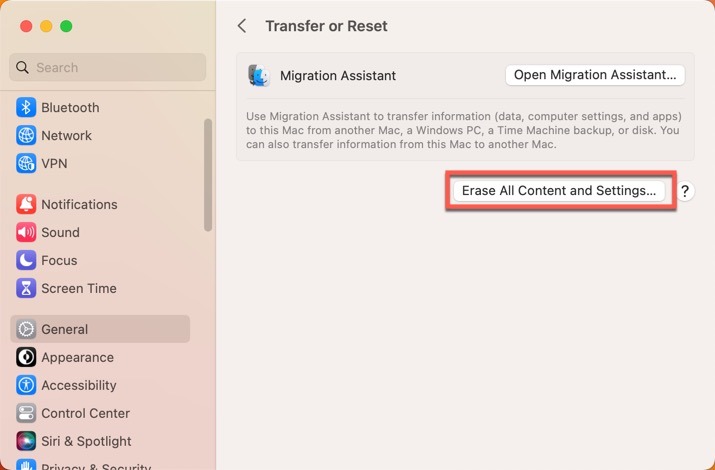
- A new window titled Erase Assistant will open. Enter your administrator information, then click on “Unlock.”
- Review everything that will be erased from your Mac, and click “Continue.”
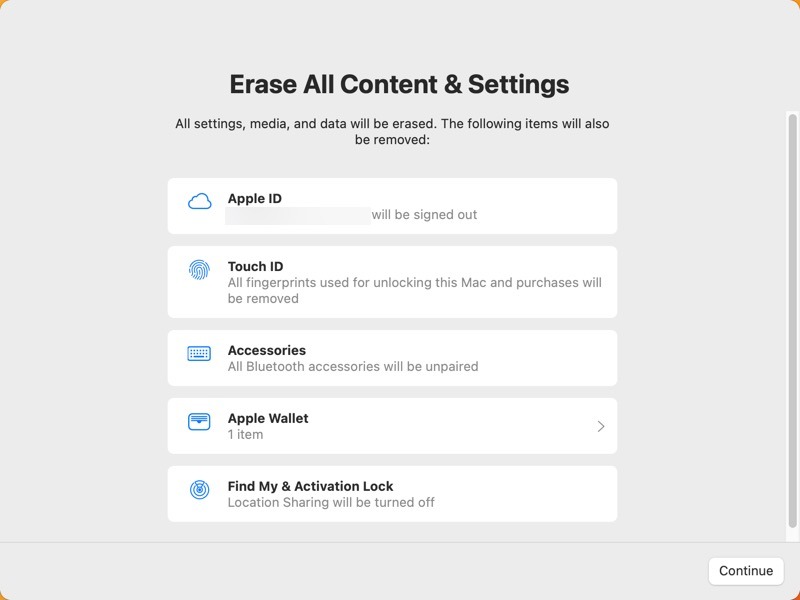
- Follow the onscreen instructions to complete the process.
Tip: there are certain things that you should always do before and after you format your Mac.
5. Replace the Hard Drive
Replacing the faulty hard drive is the ultimate solution, the proverbial “pulling the ailing tooth” of S.M.A.R.T. issues. It might sting a bit (both physically and on your wallet), but it can offer sweet relief from those nagging errors.
Before we delve into this, we need to make one thing clear: replacing a hard drive is no walk in the park. Unlike the above-described solutions, it involves opening your Mac and swapping physical components.
If you’re brave enough to attempt a DIY hard drive replacement, there are plenty of tutorials online on sites like iFixit that you can follow. But if you’re not comfortable with the idea of poking around the guts of our beloved Mac, we recommend contacting Apple Support or taking your Mac to your nearest Apple Store or authorized service provider.
Frequently Asked Questions
How can I read S.M.A.R.T. data on macOS?
You can read S.M.A.R.T. data on macOS using the built-in Disk Utility tool. Open the “View” menu, choose “Show All Devices,” then select the physical disk you want to check. If the “S.M.A.R.T. Status” reads “Verified,” your drive is in good health. If it reads “Failing” or shows any other message, there may be a problem.
Do USB flash drives support S.M.A.R.T. technology?
USB flash drives typically don’t support S.M.A.R.T. technology. This system is primarily designed for hard disk drives (HDDs) and solid-state drives (SSDs).
Will Apple replace my faulty hard drive?
Apple’s response will depend on several factors, like your warranty status, the specific nature of the fault, and whether your Mac has been subjected to any form of misuse or accidental damage.
Image credit: Unsplash. All screenshots by David Morelo.
Our latest tutorials delivered straight to your inbox