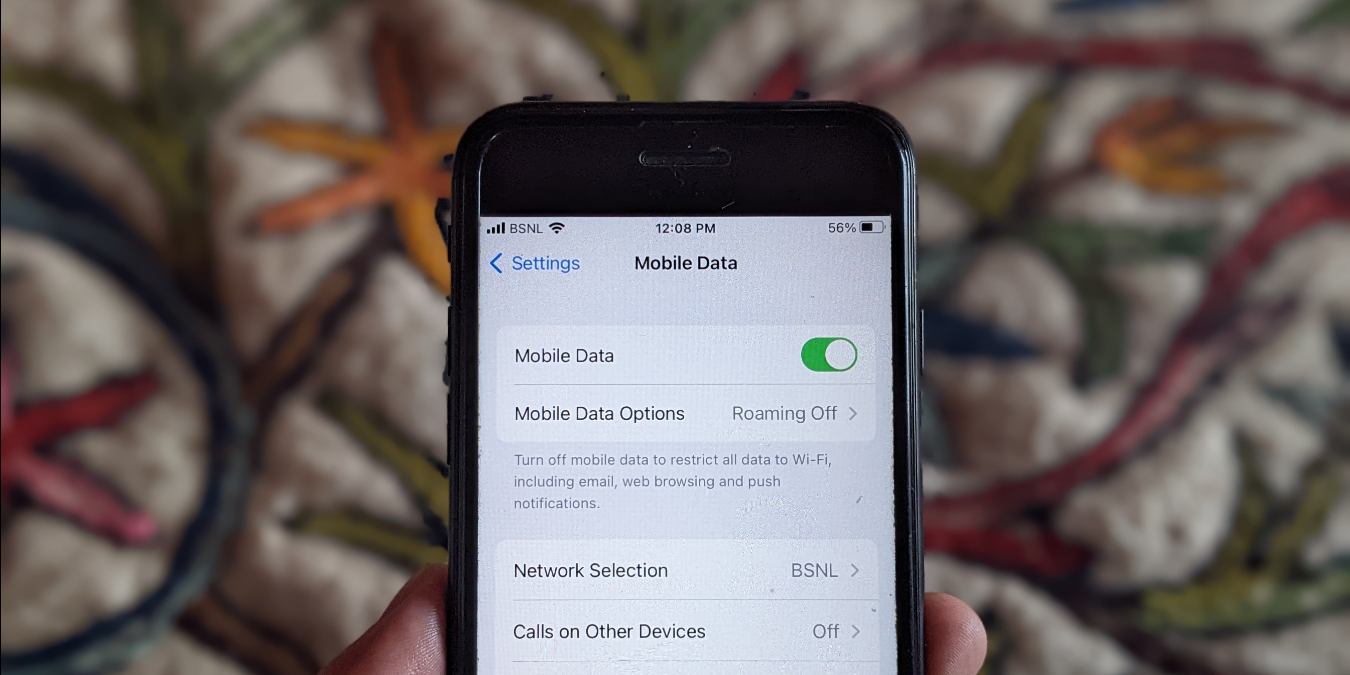
Sometimes your cellular data will stop working on your iPhone or iPad. Assuming you are not just in a poor coverage area, there are a few general steps you can take to fix “cellullar data not working” on your iPhone or iPad.
Note: If you’re instead trying to fix the cellular/mobile data not working on your Android, we can help!
- 1. Restart Your iPhone or iPad
- 2. Check Cellular Data Settings
- 3. Enable Mobile Data Roaming
- 4. Turn Off Wi-Fi
- 5. Turn off Airplane Mode
- 6. Remove Cellular Profiles
- 7. Turn Off VPN
- 8. Check Cellular Data Settings for Individual Apps
- 9. Turn Off Wi-Fi Calling
- 10. Reinsert SIM Card
- 11. Check Carrier Status
- 12. Check for Carrier Updates
- 13. Check for iOS Updates
- 14. Reset Network Settings
- 15. Factory Reset Your iPhone
- 16. Ask Apple for Help
- Frequently Asked Questions
1. Restart Your iPhone or iPad
The first thing you must do to fix the cellular data not working on your iPhone or iPad is to do a hard restart of your device. The steps to restart differ depending on device.
Restart iPhone X, 11, 12 or 13
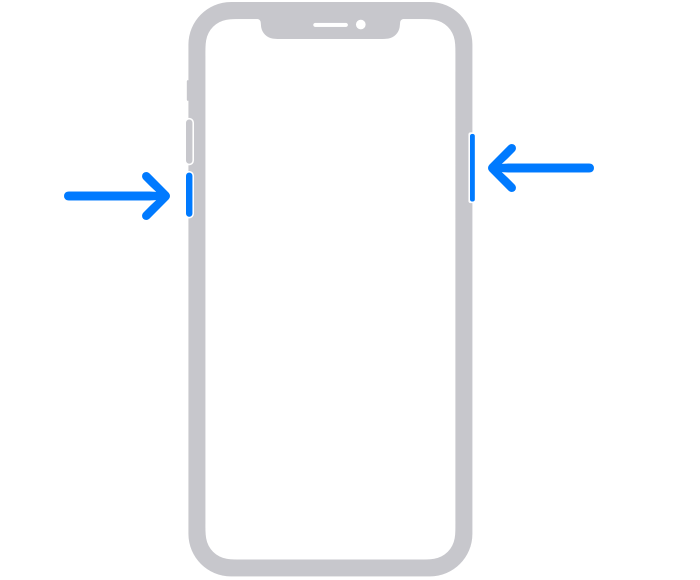
Press and hold the volume down and side buttons until you see the “Slide to Power Off” screen. Drag the slider to power off the phone and wait 30 seconds before powering back on. Use this method for iPhone X and above.
Restart iPhone SE (2nd gen), 8, 7, or 6
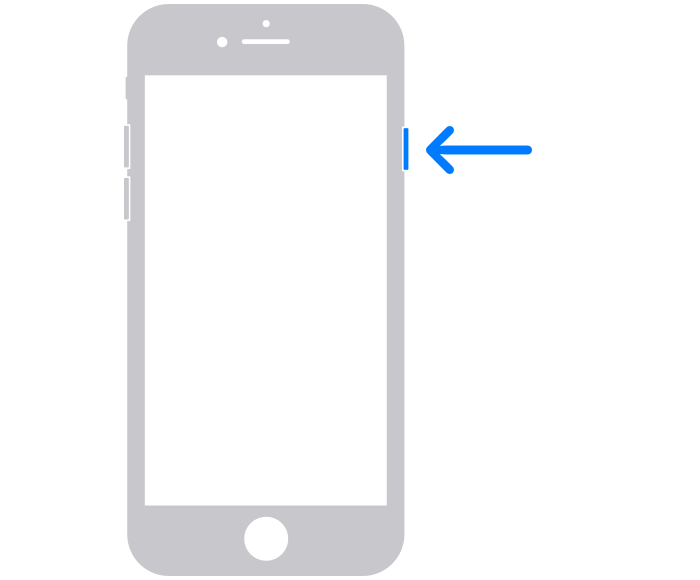
Press and hold the power button on the right side until the “Slide to Power Off” screen appears. Drag the slider to the right, then wait 30 seconds before powering the device back on.
Restart iPad Air, Pro and Mini 6
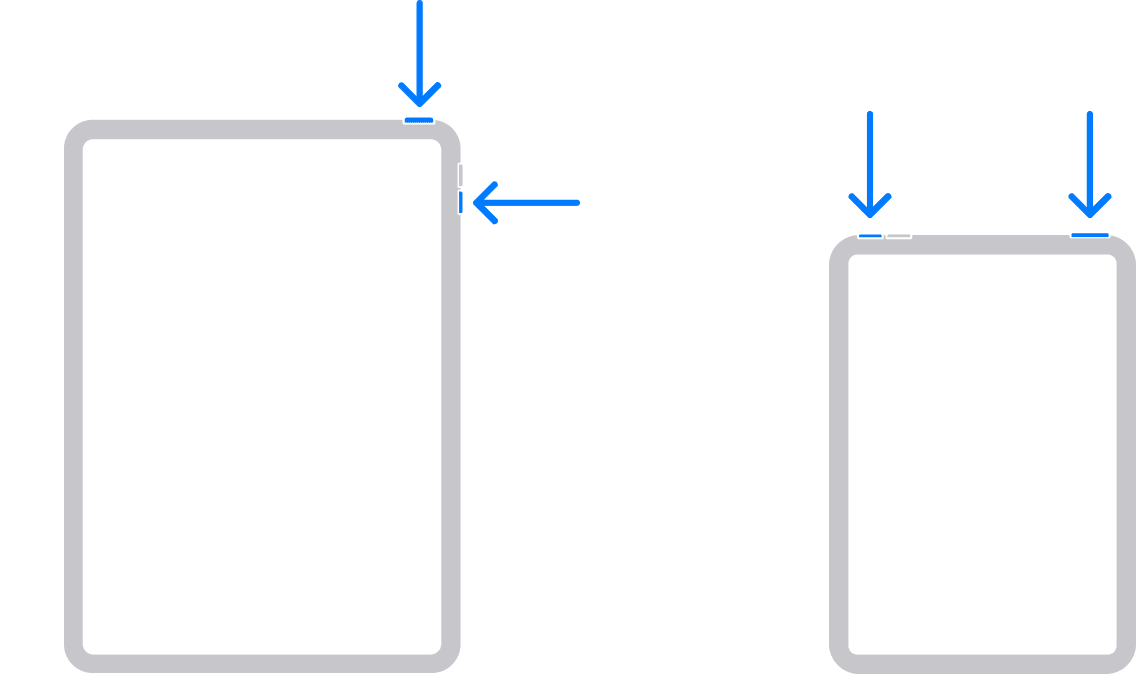
Press and hold either the up or down volume button along with the top button until you see the “Power Off” Slider appear. Drag the slider, wait at least 30 seconds, then turn it back on. You will know the iPad is turning on once you see the Apple logo appear on the screen.
Restart iPads with Home Button

Press and hold the top button until you see the “Power Off” slider appear. As with the steps above, drag the slider so that the iPad turns off and wait 30 seconds to one minute before powering the device back on. Press and hold the top button until you see the Apple logo appear to ensure that the iPad is turning back on.
2. Check Cellular Data Settings
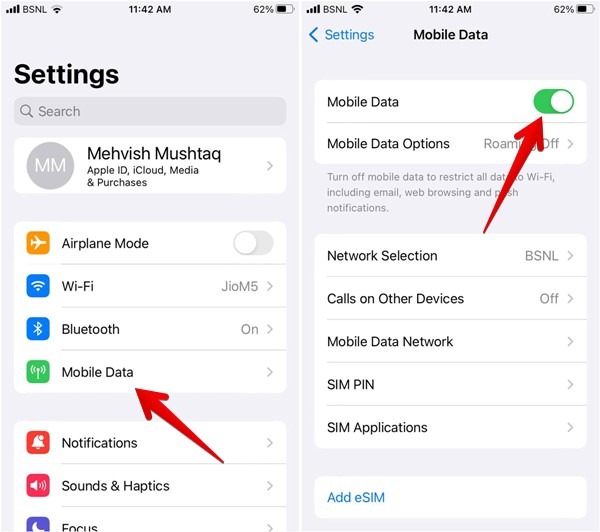
To be on the safe side, take a look at cellular data settings and make sure it is turned on. Go to “Settings -> Cellular/Mobile Data” and make sure the toggle next to “Cellular Data” or “Mobile Data” is turned on. If it’s already on, turn it off and back on again.
3. Enable Mobile Data Roaming
If you are traveling in a state or country different from where your SIM Card was originally issued, you must turn on data roaming.
To do so, go to “Settings -> Cellular or Mobile Data -> Mobile Data Options.” Enable the toggle next to “Data Roaming.”
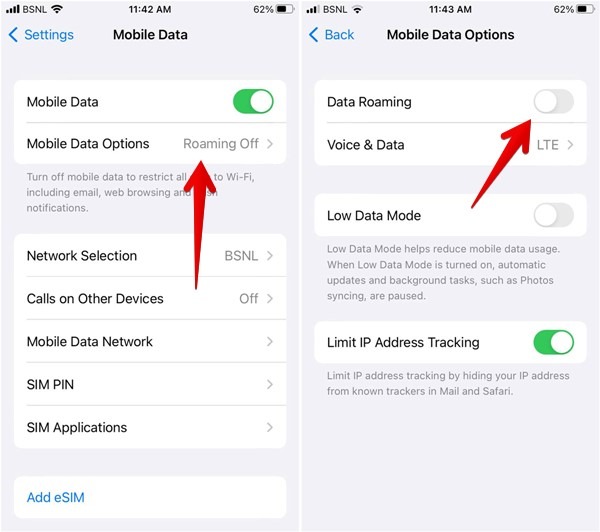
Tip: tap on “Voice & Data” and make sure the right cellular service is enabled.
4. Turn Off Wi-Fi
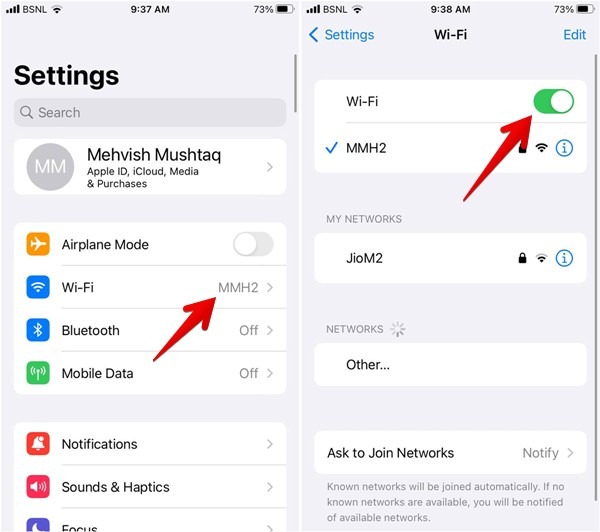
If you are in an area or building with Wi-FI and have it enabled, cellular data won’t work turn on. You will need to disable Wi-Fi to use cellular data in this case. To do so, open “Settings” on your iPhone. Go to “Wi-Fi” and turn off the toggle next to it.
5. Turn off Airplane Mode
If Airplane mode is enabled on your iPhone, it will turn off most network connections on your phone, including cellular service. Airplane Mode could be responsible for your cellular data not working.
To turn off Airplane Mode, go to “Settings” and turn off the toggle next to “Airplane Mode.”
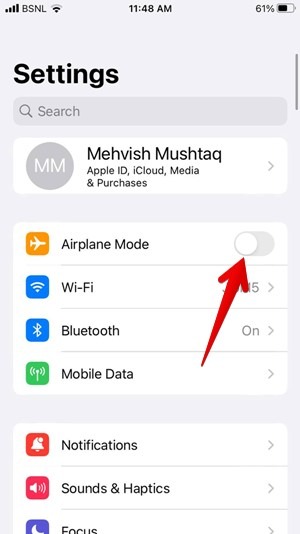
If it’s already off, turn it on for a few seconds, then turn it off again. This will help restart the network connections on your iPhone and will possibly fix the cellular data not working problem.
6. Remove Cellular Profiles
If you have recently changed your SIM card on your iPhone, you should delete any cellular profiles linked to your old SIM card.
To do so, go to “Settings -> General -> VPN & Device Management.”
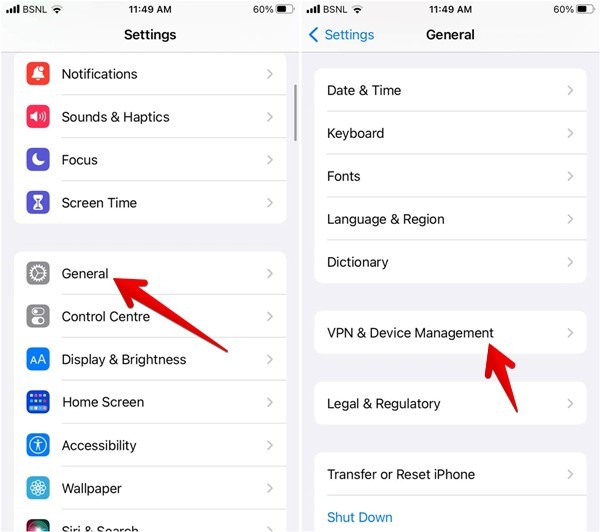
You will find all the available profiles. Tap on the profile that you want to delete and hit the “Delete Profile” button.
7. Turn Off VPN
If you are using or are subscribed to a VPN on your iPhone, it can also block your cellular signal from connecting. Disable your VPN temporarily to see whether that resolves the mobile data connection issue on your iPhone.
Go to “Settings -> General -> VPN & Device Management -> VPN.” Turn off all VPN profiles, then restart your iPhone.
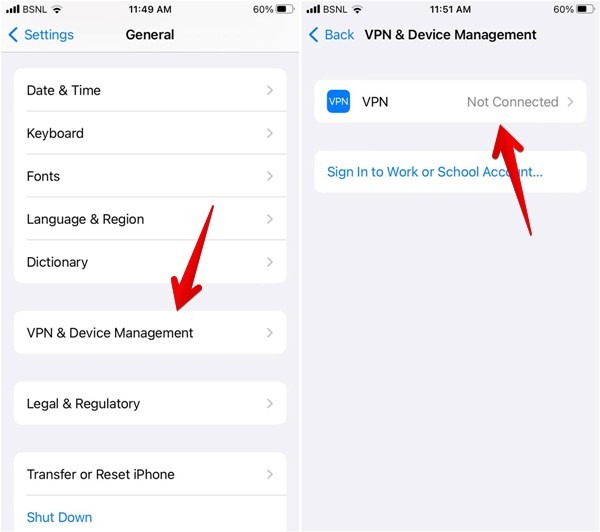
You should also check for any third-party VPN apps on your iPhone. Uninstall or disable those VPNs.
8. Check Cellular Data Settings for Individual Apps
If it’s only a specific app, like Safari or WhatsApp, not connecting to the cellular data, check and enable cellular data for the problematic app.
Go to “Settings -> Cellular Data/Mobile Data.” Scroll down and make sure the toggle next to the problematic app is turned on.
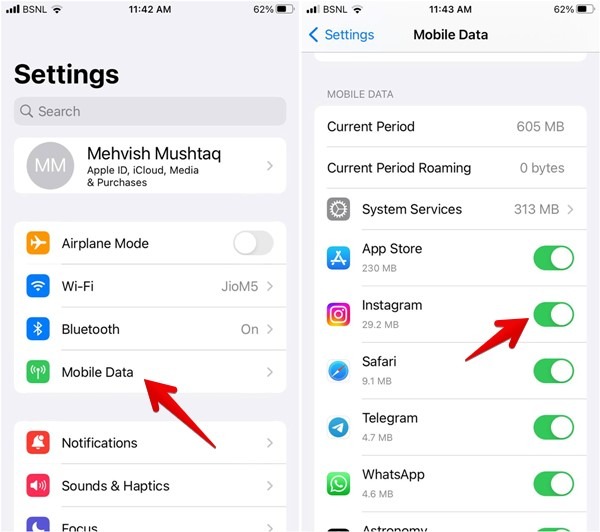
If it’s already on, try reinstalling the app. We have a list of fixes if it’s Safari that’s not working.
9. Turn Off Wi-Fi Calling
Wi-Fi calling is a great feature, automatically switching a regular phone call to a Wi-Fi network if your phone detects that you can get a better signal that way.
That said, in some cases, Wi-Fi calling can interfere with a cellular connection. As a quick fix, try switching off Wi-Fi calling if you’re on a cellular connection.
Go to “Settings -> Cellular/Mobile Data -> Wi-Fi Calling,” and tap the toggle so that it’s in the “Off” position.
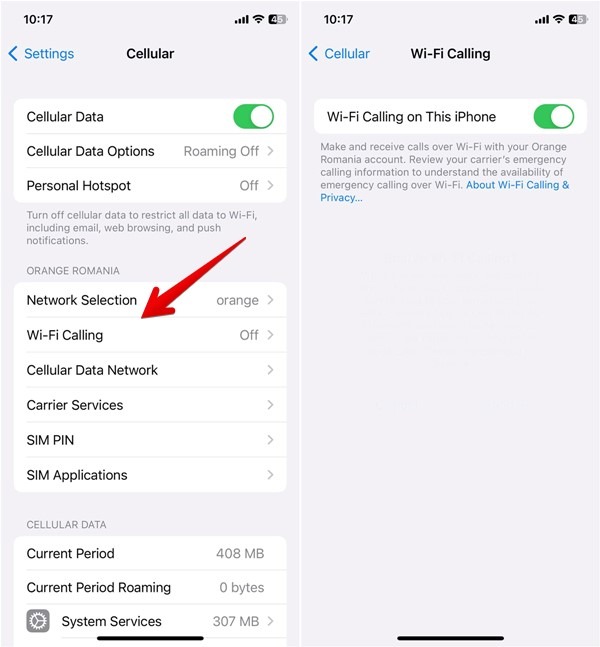
Alternatively, go to “Settings -> Phone -> Wi-Fi Calling,” then tap the slider for Wi-Fi calling so that it’s grey.
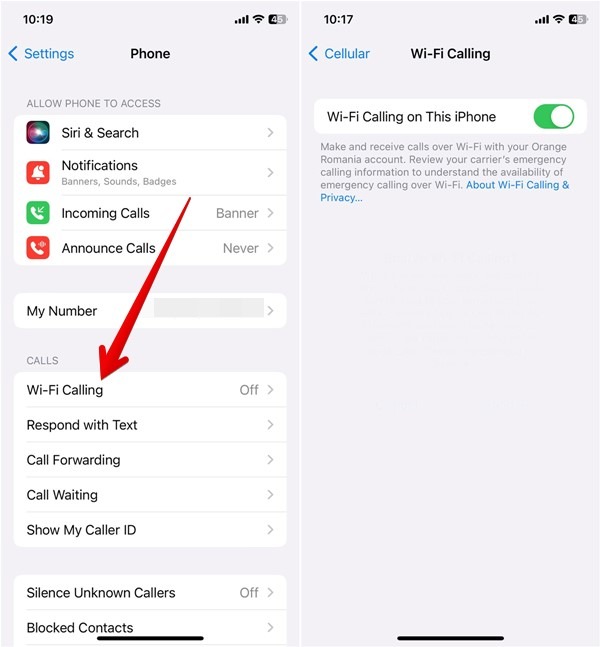
If it doesn’t fix the cellular data not working on your iPhone, turn Wi-Fi calling back on and move to the next step in this list.
10. Reinsert SIM Card
If the above fixes don’t help, you should try reinserting your SIM card. While it’s unlikely the card got dirty or dusty inside your phone, reinserting it forces your phone to re-read the SIM card and can jolt your cellular data back to life.
Follow these steps to remove and reinsert the SIM card on your iPhone:
- Power off your iPhone.
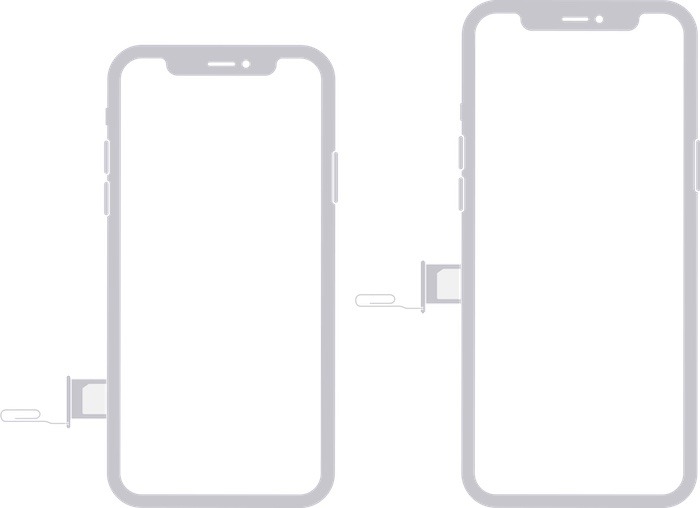
- Remove the SIM card tray. You will need a safety pin or something small to remove it.
- On the iPhone 12 and 13 models, the SIM card tray is on the left.
- On the iPhone 11 and earlier, the SIM card tray is on the right.
- Blow some air on the SIM card to remove dust particles.
- Reinsert the SIM card by sliding it back in.
- Power your phone back on.
Good to know: if you get irritated or worried about someone who continues to call you, you can block the number and never worry about that person or number again.
11. Check Carrier Status
Make sure there is no carrier outage in your area. While infrequent, outages can occur, especially during times of bad weather. Check your carrier’s social media pages, or downdetector, to learn whether there are any outages in your area.
12. Check for Carrier Updates
If you’re suffering from a genuine bug, you may find relief in a carrier update. There is a good chance that an update will benefit your cellular connectivity, if not completely resolve any recent network issues.
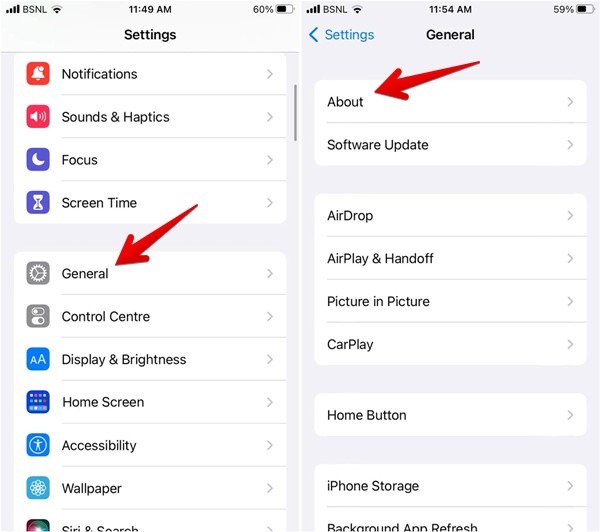
Open the “Settings” app and go to “General -> About.” Wait to see whether you receive a pop-up titled “Carrier Settings Update.” If you do, tap on “Update” and wait for the update to take place.
Tip: You’re not limited to only one email on an iPhone. You can add as many email addresses as you want.
13. Check for iOS Updates
If there’s no carrier update, there might be an updated version of iOS. Many cellular issues can be resolved via a software update. Apple works closely with its carrier partners to identify network connection issues, and you often see these fixes appearing in new iOS software update notes.
- Open the Settings app, scroll down and tap the “General” menu option.
- Under “General,” tap “Software Update.”
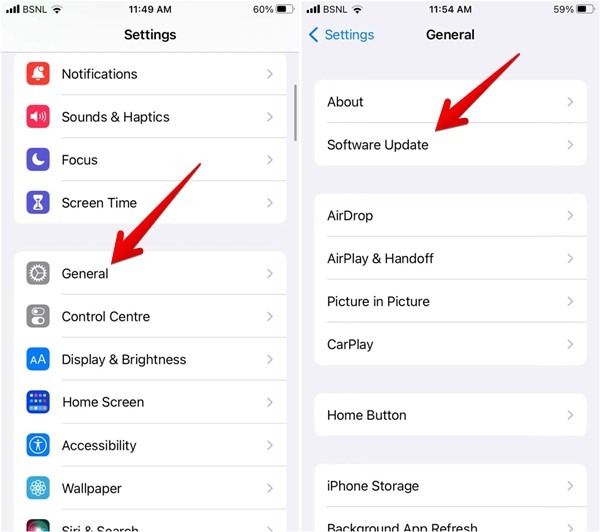
If an update is available, install it. Your phone will restart during this process. After the restart, check to see whether your mobile data issue is resolved.
14. Reset Network Settings
If cellular data stubbornly refuses to cooperate, we may need to reset the network settings completely. This will wipe out any saved Wi-Fi networks and paired Bluetooth devices while resetting your cellular data settings to the defaults.
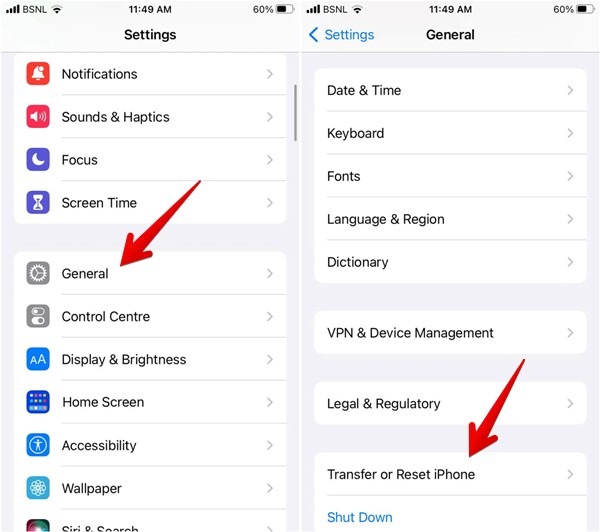
- Open the Settings app and tap on the “General” menu option.
- Scroll down and tap on “Transfer or Reset iPhone” at the bottom of the screen.
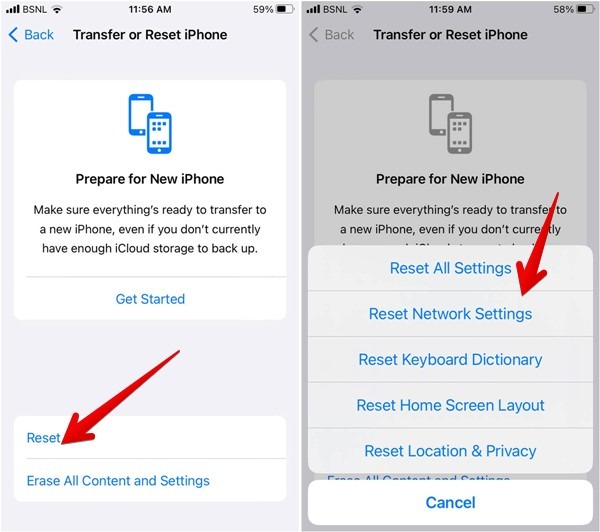
- Tap on “Reset” followed by “Reset Network Settings.” After the restart, all of your network settings will be reset.
If instead you need to forget the network on your iPhone, we walk you through the steps to do so.
15. Factory Reset Your iPhone
For the most stubborn mobile data problems, sometimes you need to start from the very beginning. With this option, which is admittedly the most drastic and should be your last resort, you can restore your device to factory settings. By doing so, all data will be deleted on your iPhone.
Therefore, before undertaking any such action, you will want to make sure your iPhone is backed up.
Follow these steps to create a backup and reset your iPhone.
- Open the Settings app and tap on your name at the top.
- Look for the “iCloud” option, which should be under the first set of menu settings for your name, password, etc. When you locate this setting, tap on it.
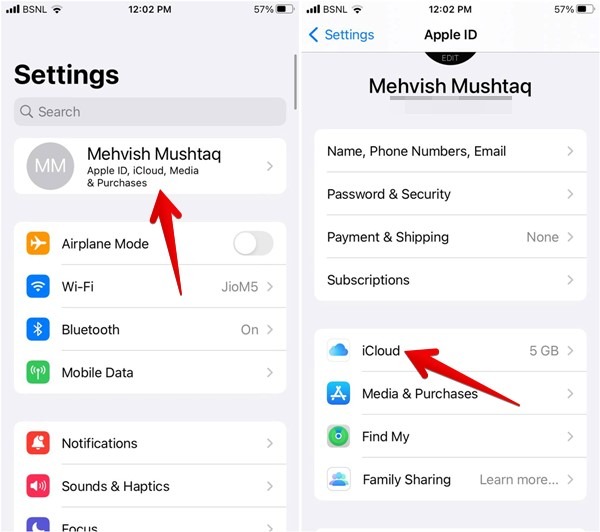
- When the next screen opens, scroll down and look for the “iCloud Backup” option. Tap on it to jump to the next screen.
- Enable the toggle next to “Back Up This iPhone” to perform an iCloud backup.
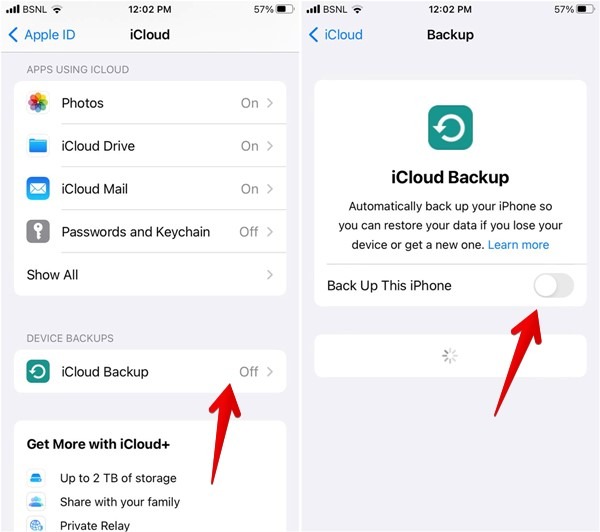
With your iCloud backed up, all of your most important data, like apps, contacts, calendar, etc. are backed up. You can factory reset your device to see whether it helps resolve your cellular data issue.
- Begin your factory reset by going to your Settings app and tapping on “General.”
- In the General menu screen, scroll down until you find the “Transfer or Reset iPhone” option and tap on that as well.

- Tap on “Erase all content and settings.”
- On the screen that says “Erase This iPhone” press “Continue” to confirm the reset.
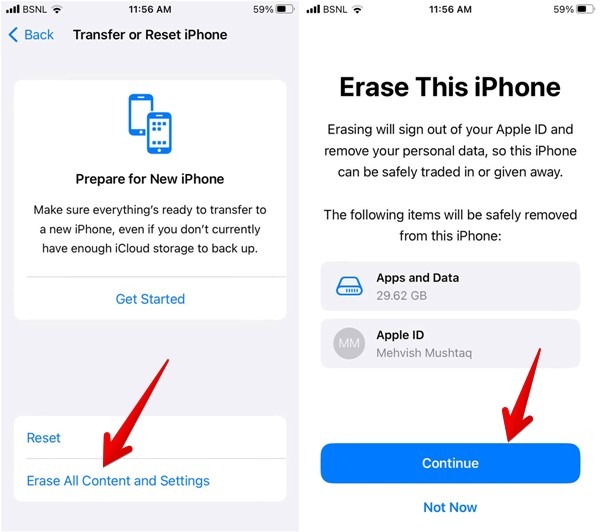
- Wait for your iPhone to start back up. When it does, choose one of two options:
- Restore your device with the iCloud backup to ensure that your device will look and feel as it did before your factory reset. The caveat here is that by doing so, you may not have removed whatever app or software issue is the root cause of your cellular connection trouble. However, by going this route, you won’t have to reinstall everything, reenter usernames and passwords on your apps, etc.
- Restore your iPhone to a “like new” state. This option, while more tedious due to the need to manually restore all of your previous apps and data, may have the benefit of removing any app or service that was causing your cellular data to not connect properly.
Tip: learn how to transfer data to a new iPhone.
16. Ask Apple for Help
The absolute final step should none of the above work is to reach out to Apple. Whether it’s a phone call or an appointment in the store, explaining your issue to Apple may be your last resort.
The issue with your cellular data may be a hardware issue and not software, meaning none of the above steps will help. Apple can help replace your device if it’s still under warranty or provide you with some options for upgrading (so can your carrier) to see if that fixes your cellular data issues.
Good to know: If you forget your passcode, we show you how to unlock it.
Frequently Asked Questions
Should you contact your wireless provider before contacting Apple?
Sure. It’s good to know if the problem is as simple as an outage or issue in your area. They can also assist you in making sure you have the right cellular settings enabled should something get changed. If they are unable to help, they will send you on to Apple for additional assistance.
Will similar problems exist on an Android device?
Absolutely! Cellular connectivity issues are by no means exclusive to Apple. As indicated in a few of the steps above, some of the issues that could be causing your signal issue may not be related to Apple at all. It could be an app that is interfering, a bad carrier settings update, etc. Android devices have a similar set of steps to go through, should you need to troubleshoot connectivity.
What happens if I see "No Service" or "Searching"?
These are fairly common messages that can indicate there is an issue with your cellular connection. Should one of these pop up, as opposed to not being able to make calls, load a website, etc., you should follow the same steps as above. Separately, you should also ensure that you are in a proper coverage area for your carrier or whether you need to work with them to ensure roaming is set up on your account.
All images and screenshots by Mehvish Mushtaq.
Our latest tutorials delivered straight to your inbox