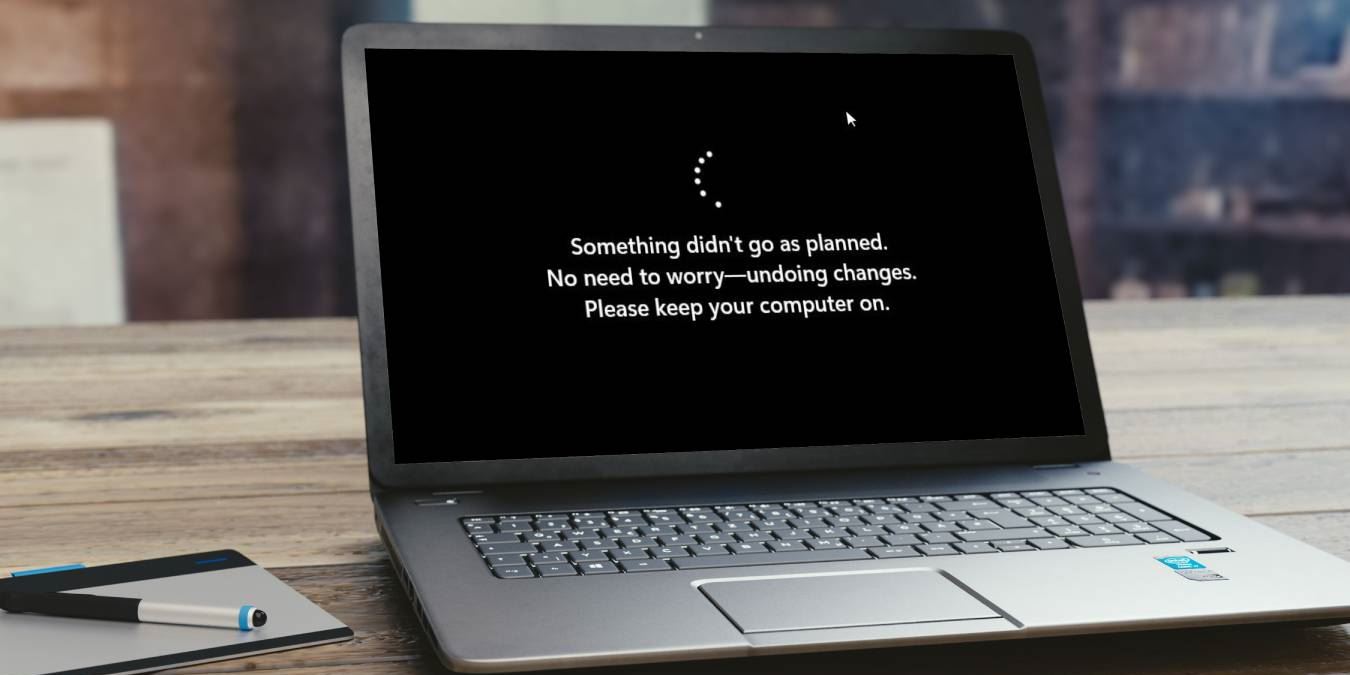
When you’re installing updates in Windows, you may stumble upon the “Something didn’t go as planned” error. This usually happens if your Windows Update components have become corrupted, or your antivirus app is mistakenly blocking updates, among other things. This guide gives you a few suggestions on how to fix the error.
Good to know: if you’re dealing with Desktop Window Manager high memory usage, check out this post on how to bring things back to normal.
Basic Troubleshooting
Before applying the more complex solutions below, try implementing these basic fixes, which may save you some time and effort:
- Uninstall your antivirus software program – antivirus app Malwarebytes has been known to interfere with Windows updates, preventing them from installing properly. Our suggestion is to uninstall the app from your system to see if it solves your issue. You may want to uninstall your antivirus, even if it’s not Malwarebytes. Don’t worry, though, as the built-in Windows Security suite has your back.
- Run the Windows Update troubleshooter – the troubleshooter is a built-in tool in Windows designed to diagnose and automatically resolve issues related to Windows Update.
- Free up drive space – Windows updates can fail to install when there’s not enough space on your disk. Refer to our post to see how to start making space on your C drive.
FYI: is a window missing on your desktop? Learn how to move a window that is off screen back into focus.
1. Reset Windows Update Components
Your Windows Update components may be corrupted or damaged. Repairing or resetting them may fix the issue.
Open the Run utility by pressing Win + R on your keyboard. Type cmd in the box, and press Ctrl + Shift + Enter to run Command Prompt with administrator access. Click Yes when asked to confirm in the User Account Control dialog.
Run the following DISM (Deployment Image Servicing and Management) commands first. This will prompt Windows Update to download the necessary files to fix damaged system files.
dism /Online /Cleanup-image /ScanHealth
dism /Online /Cleanup-image /CheckHealth
dism /Online /Cleanup-image /RestoreHealth
dism /Online /Cleanup-image /StartComponentCleanup
sfc /scannow
Run SFC, starting the repair process for your corrupted system files to try to repair any issues with your Windows Update components. If it still doesn’t work, proceed with the manual reset.
Execute the following commands to the Command Prompt one by one to stop the BITS, Windows Update, and Cryptographic services.
net stop bits
net stop wuauserv
net stop cryptsvc
Run the command below to delete the qmgr*.dat file from your computer.
del C:\ProgramData\Microsoft\Network\Downloader\qmgr*.dat
Copy-paste each command to rename the related folders as BAK files.
ren %Systemroot%\SoftwareDistribution\DataStore DataStore.bak
ren %Systemroot%\SoftwareDistribution\Download Download.bak
ren %Systemroot%\System32\catroot2 catroot2.bak
Execute these commands to reset the BITS service and Windows Update service.
sc.exe sdset bits D:(A;CI;CCDCLCSWRPWPDTLOCRSDRCWDWO;;;SY)(A;;CCDCLCSWRPWPDTLOCRSDRCWDWO;;;BA)(A;;CCLCSWLOCRRC;;;IU)(A;;CCLCSWLOCRRC;;;SU)

sc.exe sdset wuauserv D:(A;;CCLCSWRPLORC;;;AU)(A;;CCDCLCSWRPWPDTLOCRSDRCWDWO;;;BA)(A;;CCDCLCSWRPWPDTLOCRSDRCWDWO;;;SY)
Switch to the Windows folder by running the command below.
cd /d %windir%\system32
Reregister BITS and Windows Update service files with the following commands:
regsvr32.exe atl.dll
regsvr32.exe urlmon.dll
regsvr32.exe mshtml.dll
regsvr32.exe shdocvw.dll
regsvr32.exe browseui.dll
regsvr32.exe jscript.dll
regsvr32.exe vbscript.dll
regsvr32.exe scrrun.dll
regsvr32.exe msxml.dll
regsvr32.exe msxml3.dll
regsvr32.exe msxml6.dll
regsvr32.exe actxprxy.dll
regsvr32.exe softpub.dll
regsvr32.exe wintrust.dll
regsvr32.exe dssenh.dll
regsvr32.exe rsaenh.dll
regsvr32.exe gpkcsp.dll
regsvr32.exe sccbase.dll
regsvr32.exe slbcsp.dll
regsvr32.exe cryptdlg.dll
regsvr32.exe oleaut32.dll
regsvr32.exe ole32.dll
regsvr32.exe shell32.dll
regsvr32.exe initpki.dll
regsvr32.exe wuapi.dll
regsvr32.exe wuaueng.dll
regsvr32.exe wuaueng1.dll
regsvr32.exe wucltui.dll
regsvr32.exe wups.dll
regsvr32.exe wups2.dll
regsvr32.exe wuweb.dll
regsvr32.exe qmgr.dll
regsvr32.exe qmgrprxy.dll
regsvr32.exe wucltux.dll
regsvr32.exe muweb.dll
regsvr32.exe wuwebv.dll
To reset Winsock run this:
netsh winsock reset
Restart the BITS, Windows Update, and Cryptographic services again.
net start bits
net start wuauserv
net start cryptsvc
2. Restart the Windows Update Service
Restarting the Windows Update service on your PC can also fix the “Something didn’t go as planned” issue.
Press Win + R to launch the Run dialog. Type services.msc, and click OK.
In the Services window, scroll down and find Windows Update in the listed services. Right-click it, and choose Properties from the context menu.
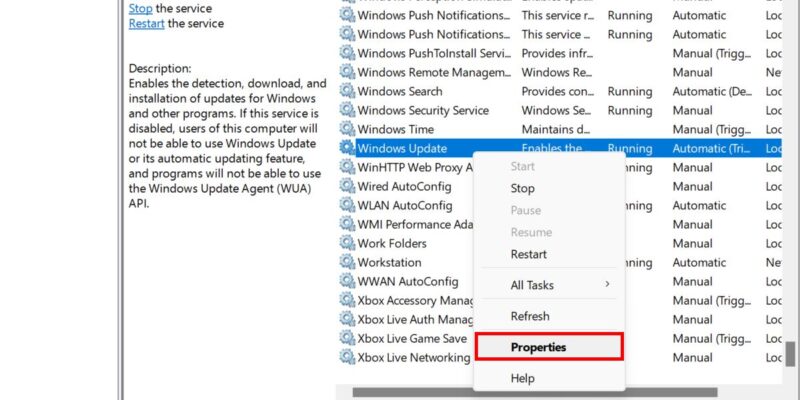
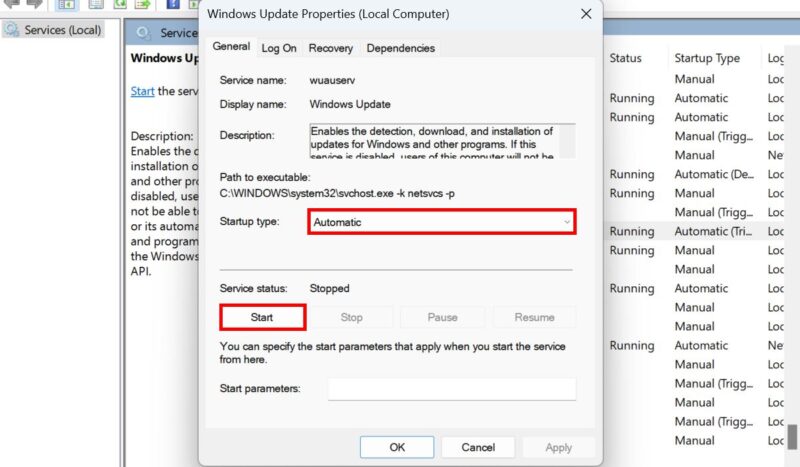
Set the Startup type to Automatic, then click the Start button. Press Apply -> OK to close the window.
Right-click Windows Update again, and choose Restart from the context menu.
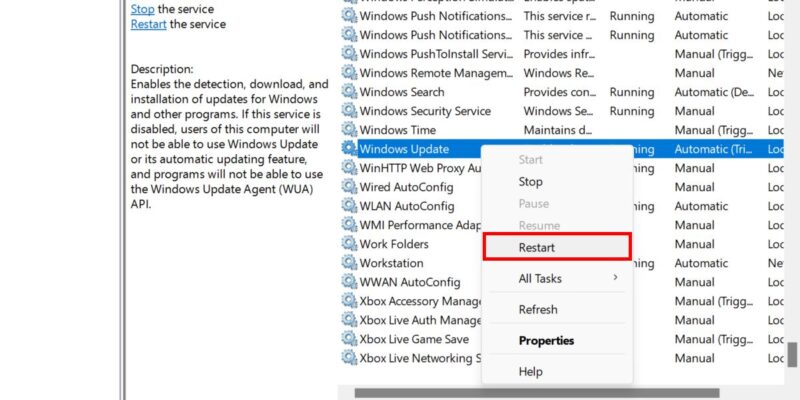
Repeat the previous steps for the Background Intelligent Transfer Service. Once done, restart your PC, and check whether the issue has been resolved.
3. Clear Windows Update Cache
It’s possible that your Windows Update cache has become corrupted, which could result in failed updates. Clearing the cached files and folders can be a solution and won’t delete any important files on your PC.
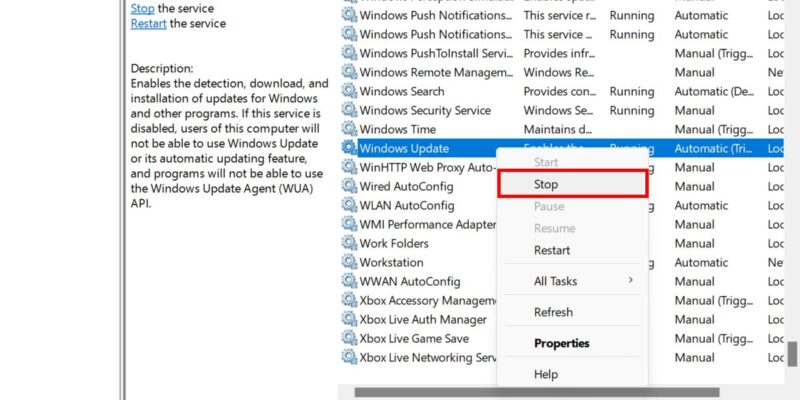
Open the Service app again, right-click Windows Update, and choose Stop.
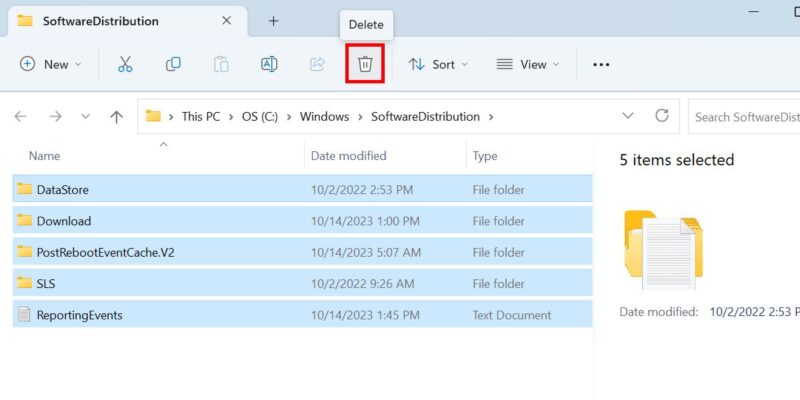
Open a Run dialog, and type C:\Windows\SoftwareDistribution to open File Explorer and redirect you to the SoftwareDistribution folder.
Select all files and folders at your current location by pressing Ctrl + A and clicking Delete at the top.
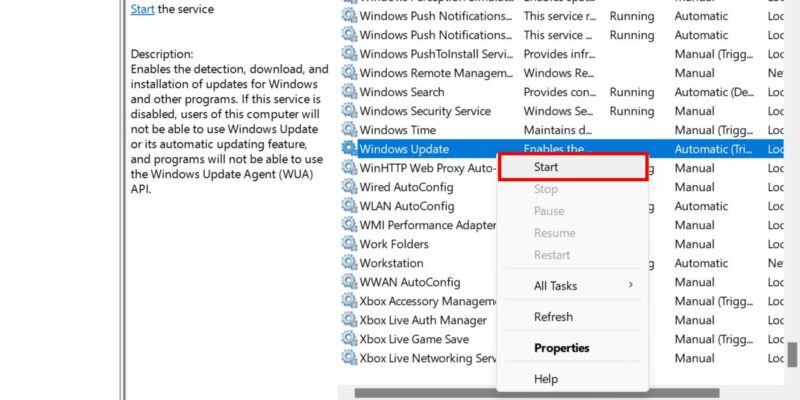
Switch to the Services window. Right-click Windows Update, and select Start. Try to reinstall the faulty Windows update.
Tip: if DiskPart encounters an error in Windows, learn what to do about it.
4. Configure System Partition ID
Windows updates may fail if instructed to install on the wrong disk partition. Prevent this from happening by assigning the correct ID to the partition where updates should be installed.
Open Command Prompt with administrator rights as explained above.
Type diskpart and press Enter to open the Diskpart utility in Windows that allows you to see, create, and remove disk partitions.
Run list disk to view all available disks on your computer.
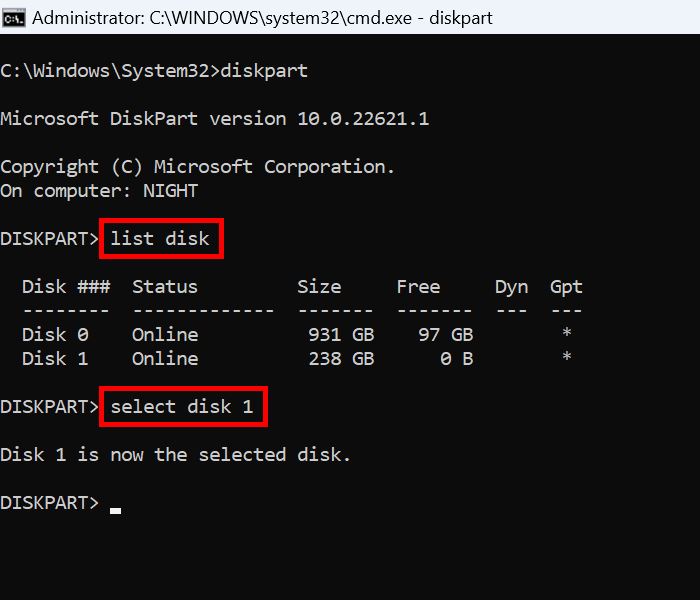
Check the generated list, and find the disk where you’ve installed Windows. Note the disk number under the Disk column.
Run select disk number, and replace number with the number of your disk.
Once you’ve selected the disk, type list partition in cmd. In the displayed list, find the System partition by checking the Type column.
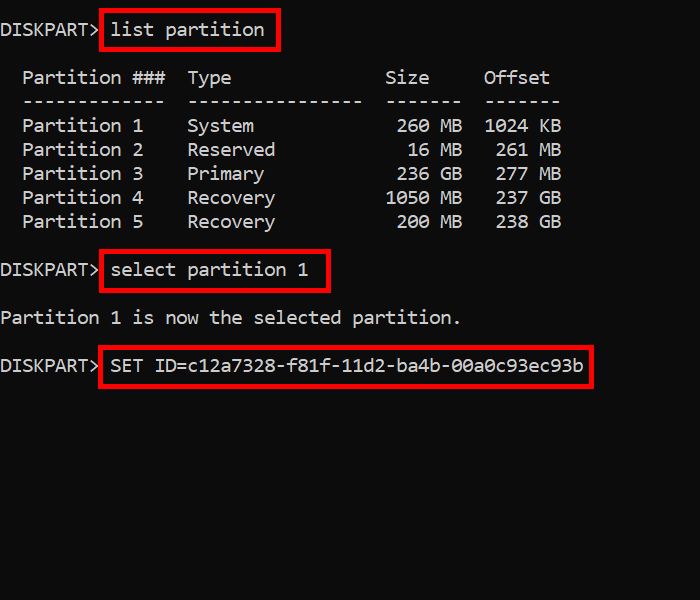
Type select partition number. Replace number with your own partition number.
Finally, run the following command to assign the correct ID for your selected partition.
SET ID=c12a7328-f81f-11d2-ba4b-00a0c93ec93b
Restart your PC to apply all these changes.
5. Disable .NET Framework 3.5
If .NET Framework 3.5 is active on your PC, it could negatively impact the update processes on your Windows device. Fortunately, this is an optional feature that you can turn off.
Navigate to Settings -> Apps -> Optional features -> More Windows features.
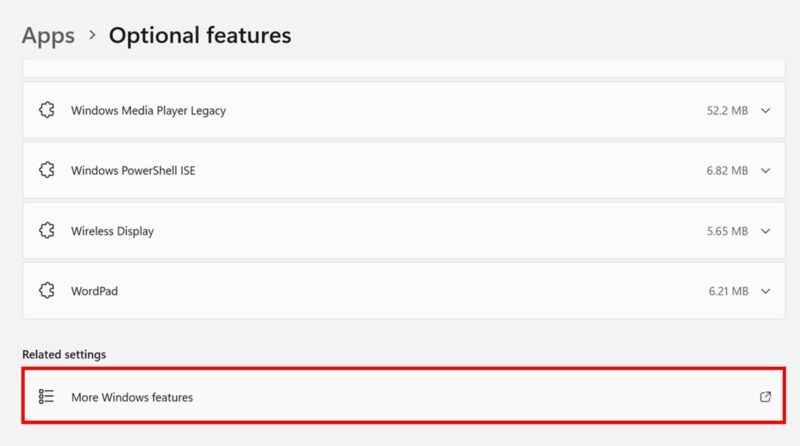
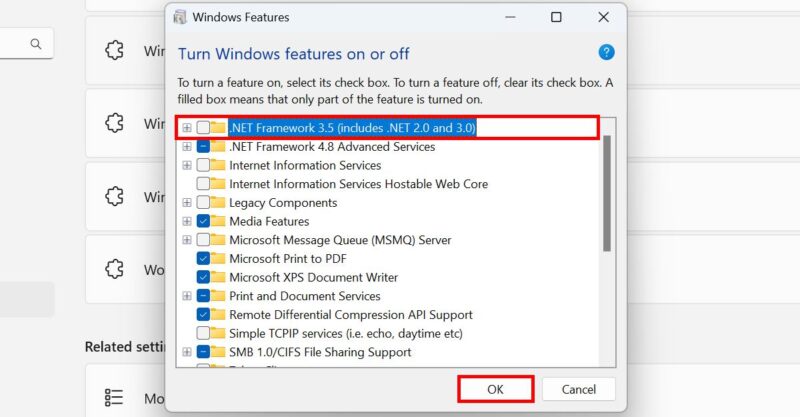
If you’re on Windows 10, launch Control Panel, and navigate to Programs -> Programs and Features -> Turn Windows features on or off.
From the features listed, locate and untick the checkbox next to the .NET Framework 3.5 (includes .NET 2.0 and 3.0) option. Press OK.
Tip: learn how to install .NET Framework on Windows.
6. Install Updates Manually
If your Windows updates are still not able to install, try manually downloading an update pack and installing it yourself. Visit the Microsoft Update Catalog, and search for your Windows version. Then, download the corresponding MSU file and install it.
7. Reset Windows 11
If none of the fixes above have worked for you, the next step should be to reset your Windows PC. You still have the option to preserve your files, so don’t worry. Check out our post to see how to start the Windows reset process on your device.
Windows Update issues tend to be quite common, so don’t despair if you run into one. On a related note, if the Windows Update service is missing on your PC, try restoring it with the Registry Editor.
Image credit: Freepik. All screenshots by Princess Angolluan.
Our latest tutorials delivered straight to your inbox