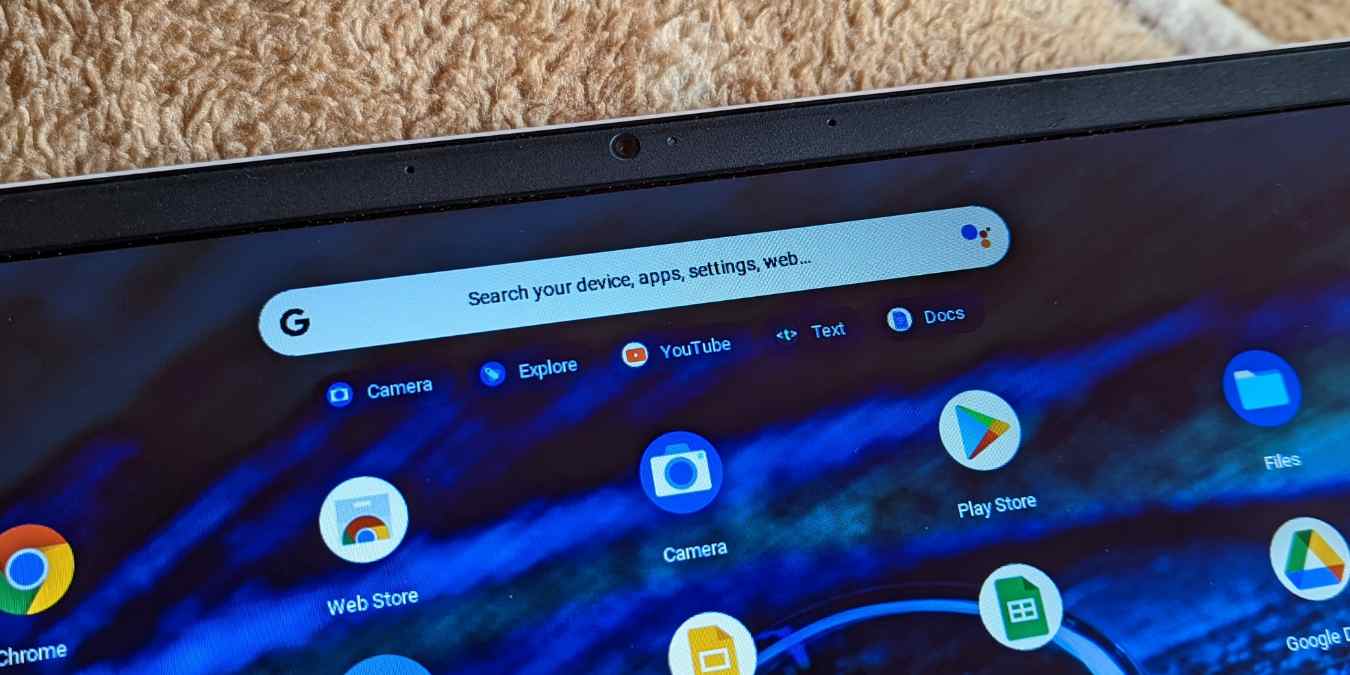
No one would want to be in a situation where you have an important video call or an online exam coming up and your Chromebook’s camera suddenly stops working. Unfortunately, Chromebook users have been facing various issues related to camera.
For instance, the camera refuses to turn on or shows a black screen. Similarly, some users see errors like “No camera found” and “Your camera is currently unavailable”. Even worse, others have reported seeing a black screen with a red light next to their camera lens. If you are experiencing a similar problems, follow us in this guide as we go through various ways to fix the Chromebook camera not working.
- 1. Restart Your Chromebook
- 2. Check the Camera Lens
- 3. Look for Privacy Switch
- 4. Reset Chromebook Hardware
- 5. Update Your Chrome Browser
- 6. Update Your Chromebook's OS
- 7. Use Camera in a Different App
- 8. Check Camera Settings in Chrome
- 9. Grant Camera Permission in Chrome
- 10. Reset Your Chrome Browser
- 11. Reset Your Chromebook
- Frequently Asked Questions
Also read: 9 Tips to Use and Customize Chromebook Shelf
1. Restart Your Chromebook
Sometimes, a minor bug in the Chromebook or a stuck app can cause issues with the camera. So you must begin the troubleshooting process to fix Chromebook’s camera by restarting your Chromebook. However, you must actually shut down the Chromebook and turn it on again instead of simply closing its lid.
- Click on the time icon at the bottom-right corner of the Chromebook’s shelf to open the “Quick panel.”
- Click on the Shutdown icon to turn off the Chromebook.
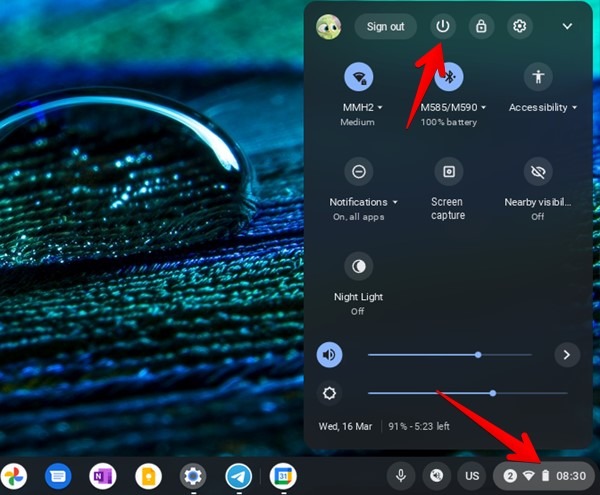
- Wait for a few seconds until the Chromebook turns off completely. Then, turn on the Chromebook like you usually do.
2. Check the Camera Lens
If you see blurry or half images from your Chromebook’s camera, you must check that the camera lens isn’t covered by anything i.e., a screen protector, privacy shutter, or some other accessory. You should also try to clean the camera with a soft cloth.
3. Look for Privacy Switch
Some Chromebooks, especially from HP, come with a physical privacy switch located on one of the sides of the Chromebook. If you see a red light on the Chromebook’s webcam lens, then this privacy switch must be disabled on your device. You must slide the switch to turn off the privacy switch.
Also read: 28 Best Chromebook Tips and Tricks for Beginners
4. Reset Chromebook Hardware
The normal restart process fixes software issues mainly. If you ever experience a hardware issue on your Chromebook like the touchpad, keyboard, or camera not working, you must try to reset your Chromebook’s hardware. Please do not worry as this will not delete your files from Chromebook.
Use the following steps that involve Power and Refresh keys to do a hardware reset.
- First, you must turn off your Chromebook. For that, click on the time icon on the shelf and press the Shutdown icon.

- Next, you need to turn on your Chromebook. For that, press and hold the Refresh key, and press the Power key simultaneously.
- Once the Chromebook boots up, release the Refresh key.
5. Update Your Chrome Browser
Updating the Chrome browser also seems to fix the camera not working on Chromebook. This happens because of bugs in the Chrome browser, which are fixed by updating it.
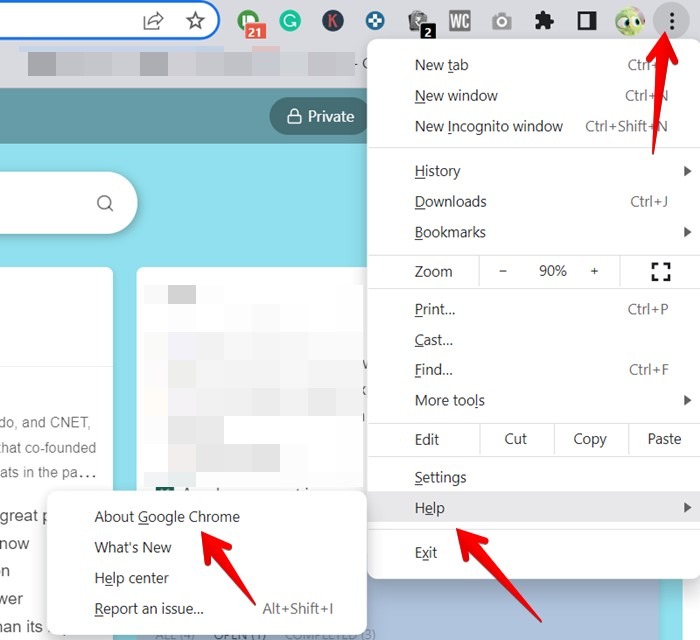
- Open the Chrome browser on your Chromebook.
- Click on the three-dot icon at the top and go to “Help→ About Google Chrome” from the menu.
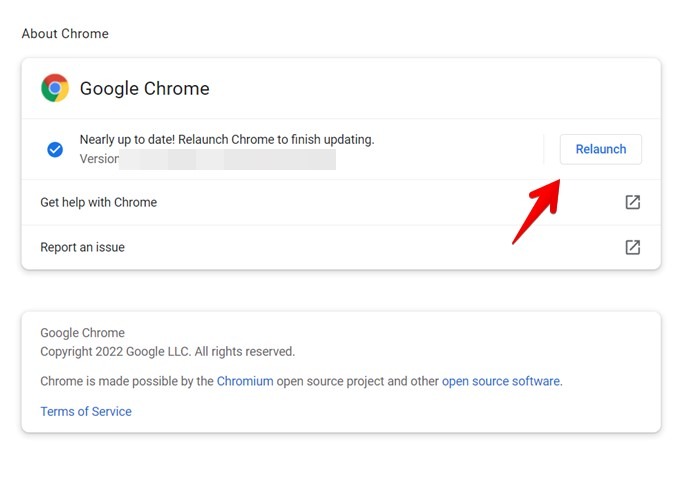
- The Chrome browser will automatically start looking for an update. Click on the Relaunch button once the Chrome browser finishes updating.
Also read: 13 Fixes for Chromebook Touchpad Not Working
6. Update Your Chromebook’s OS
Often, the Chromebook’s camera stops working due to a bug in Chrome OS. You must regularly check for updates and keep your Chrome OS updated to fix such issues.
- Click on the time icon at the bottom and press the Settings icon on your Chrome OS.
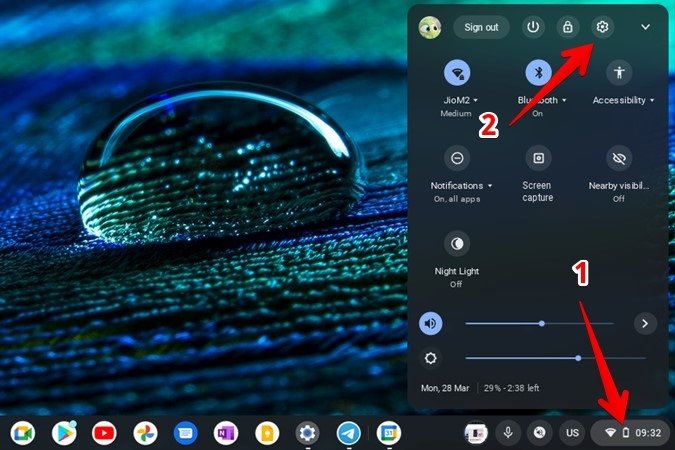
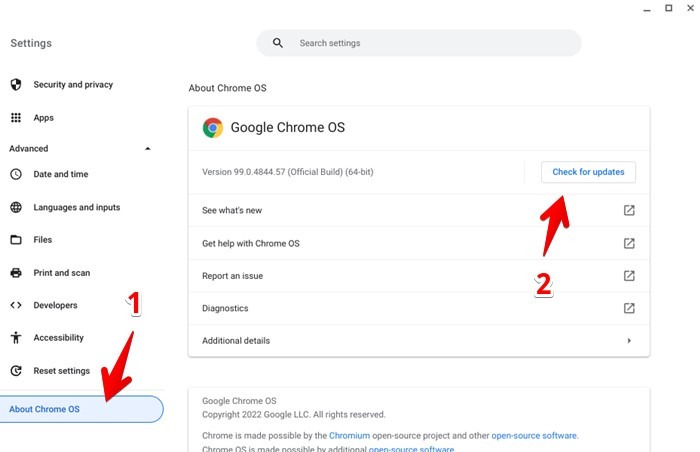
- In the Settings, click on “About Chrome OS” at the bottom.
- Check on the “Check for updates” button. Your device will start looking for the update. Install the update, if available.
7. Use Camera in a Different App
If the camera on your Chromebook isn’t working in one app, try using it in a different app from the one you normally use. If the camera works properly in other apps, try updating the problematic app. Then, restart your Chromebook. After restarting, try using the camera again in the problematic app. If the issue persists, you must re-install said app.
Pro Tip: If you are trying to use the camera simultaneously in two apps, it will not work. You must close other apps accessing the camera resource on your Chromebook.
Also read: How to Screen Record on Your Chromebook
8. Check Camera Settings in Chrome
Using the right camera settings in Chrome is essential for the camera to work properly on your device.
- In Chrome, click on the three-dot icon at the top and go to Settings.
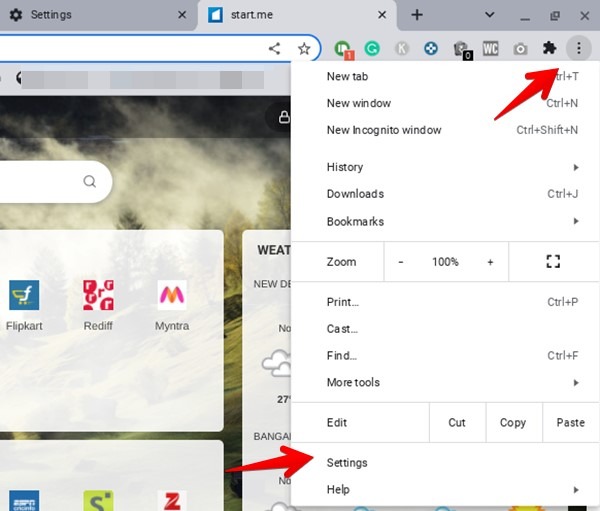
- Click on “Privacy and security” from the left sidebar.
- Go to “Site settings” in the right panel.
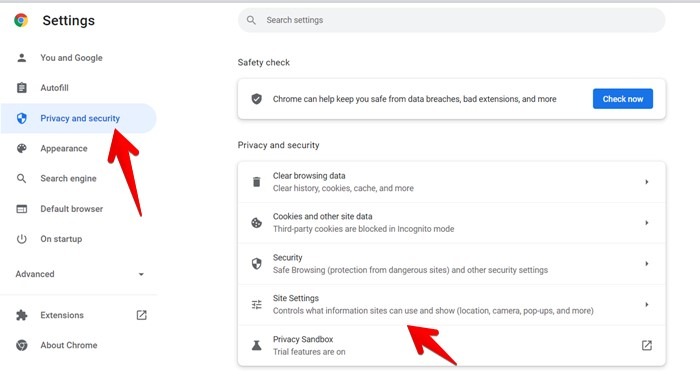
- Scroll down and click on Camera under the Permissions section.
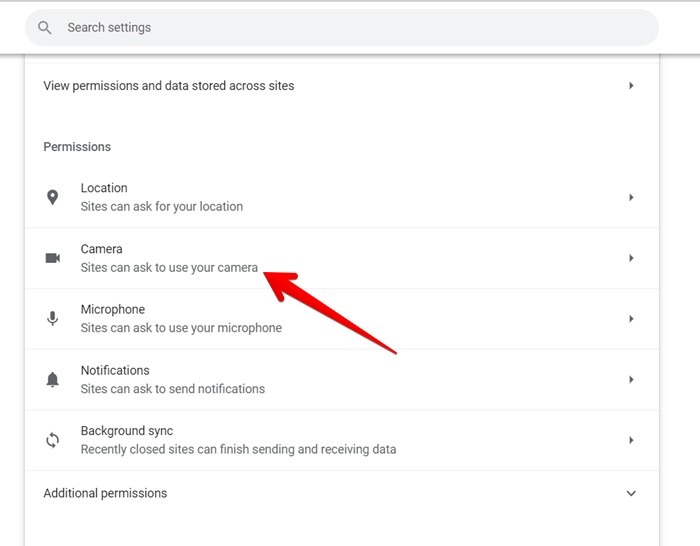
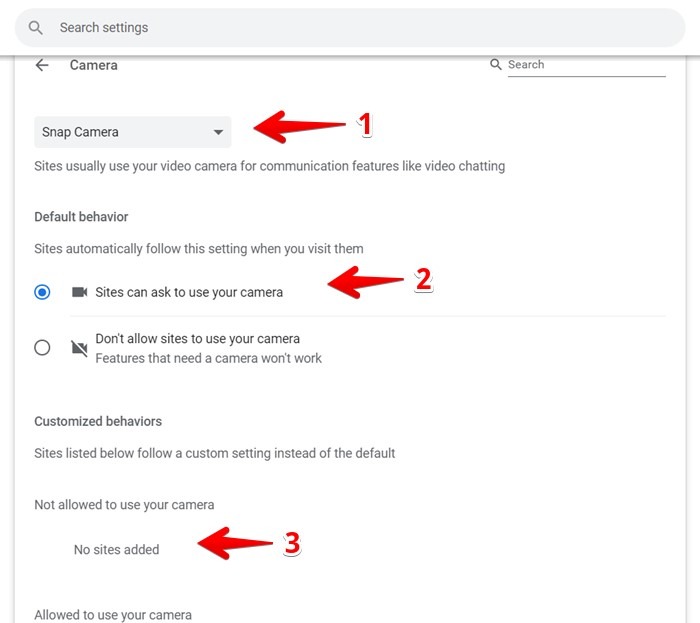
- Now, here you need to check different camera settings.
- Firstly, if you have multiple cameras on your Chromebook, make sure the right one is selected in the drop-down box.
- Next, tick the “Sites can ask to use your camera” option.
- Scroll down a bit and make sure the site on which you are trying to access the camera isn’t listed under the “Not allowed to use your camera”.
9. Grant Camera Permission in Chrome
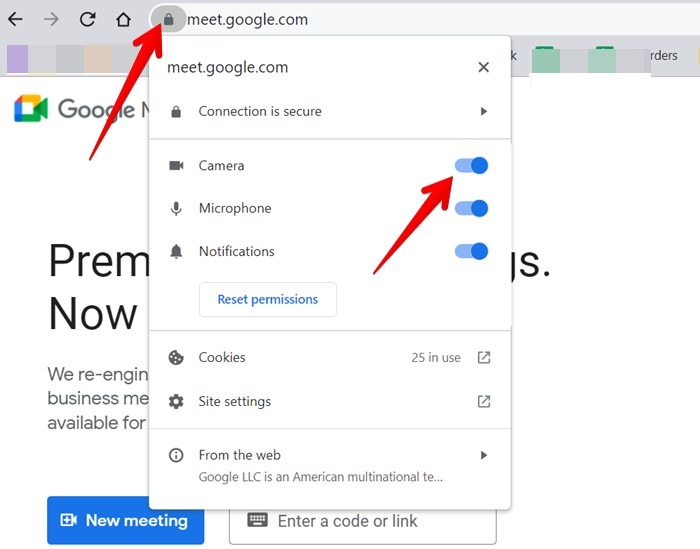
Once you have set the right camera settings in the above method, you must make sure you’ve granted camera permission to new websites in the Chrome browser that want to access the camera.
- Open the desired website in Chrome.
- Click on the lock icon present before the website URL in the address bar and enable the toggle next to the Camera.
Also read: 11 Essential Chromebook Keyboard Tips You Need to Know
10. Reset Your Chrome Browser
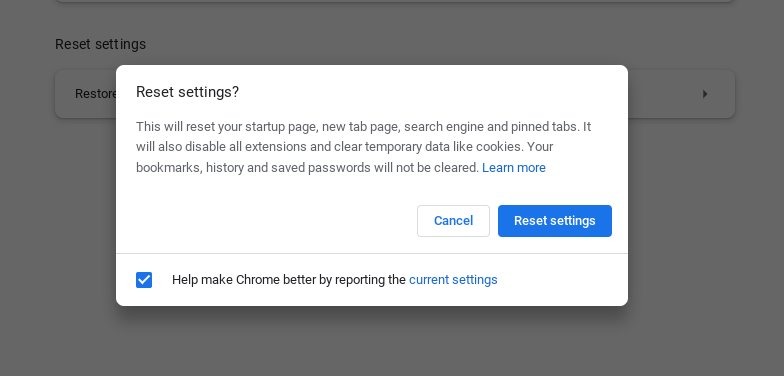
Many times, the Chromebook’s camera could stop working due to a cache issue in Chrome or due to an installed extension. You can make the camera work by resetting Chrome. Doing so will reset the startup page, search engine, pinned tabs, new tab page, disable extensions, and clear temporary data.
- Open Settings in Chrome by clicking on the three-dot icon at the top.

- Click on Advanced in the left sidebar to expand it.
- Then, click on “Reset settings”.
- Click on “Restore settings to their original defaults”.
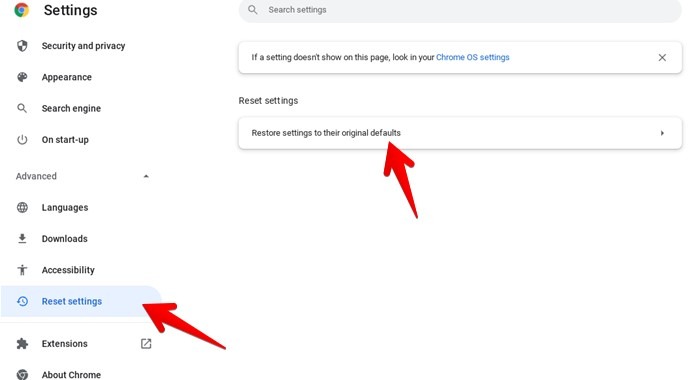
- A confirmation pop-up will show up. Click on “Reset settings”.
11. Reset Your Chromebook
Lastly, if nothing seems to fix the camera, try factory resetting the Chromebook. As expected, it will erase all the information on the Chromebook. So, make sure to back up your data before you format the Chromebook.
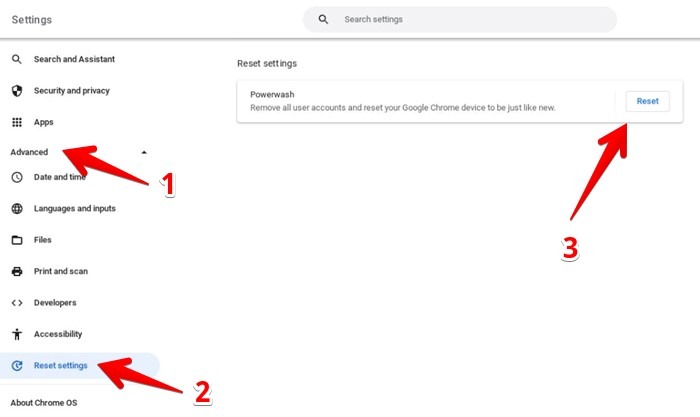
- Open Settings on your Chromebook.
- Expand the Advanced option and click on “Reset settings”.
- Next up, click on the Reset button next to Powerwash. If you face any issues while resetting your Chromebook, check our guide on how to powerwash Chromebook like a pro.
Also read: How to Take Screenshots on a Chromebook
Frequently Asked Questions
How to tell if my Chromebook’s camera not working is a hardware issue?
If the above methods don’t help in fixing the camera problem on your Chromebook, then it could be a hardware issue. You must contact the manufacturer to claim the warranty if applicable. However, before you do so, you should ask your school about the camera as many schools block the camera due to privacy reasons.
How to use an external camera/webcam with Chromebook?
Connect the external camera to your Chromebook using a USB cable. Then, launch the Chrome browser and open its Settings. Go to “Security and privacy→ Site settings→ Camera”. Choose the external camera in the drop-down box. Alternatively, if this method doesn’t work, open the Camera app on your Chromebook. Click on the Switch camera icon (looks like a refresh icon) and select the external camera. Please keep in mind that this icon will appear only when an external camera is connected or your Chromebook has 2 built-in cameras.
Can you take pictures with Chromebook’s camera?
Yes, you can capture pictures using the pre-installed Camera app on your Chromebook. Open the Camera app and press the Capture (white circle) button on your screen.
Our latest tutorials delivered straight to your inbox